Showing posts with label tutorials. Show all posts

Saturday, December 6, 2014

Drawing Wine Glass In Inkscape

https://www.dreamstime.com/stock-illustration-wine-glass-set-black-white-white-background-image60310868#res6177650


We are going to make a simple black and white drawing of a wine  glass such as the one seen here.

No previous experience in Inkscape needed.


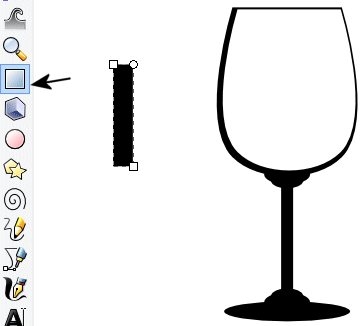
1. Click the black color on the color palette at the bottom of Inkscape, then with the rectangle tool make a rectangle by dragging the mouse while holding down the left mouse button:


 Side Note If you get a colored border around the rectangle, remove it by right clicking on the "Stroke" bar under the color palette and choose "Remove stroke" 


2. From the "Path" menu choose "Object to Path".

3. Click on the rectangle with the "Node tool":


 4. While holding down the SHIFT key select the two bottom nodes by clicking on them with the node tool:


  5. Click the "Make selected nodes smooth" button to make the bottom part of the rectangle rounded:


 6. Click the "Selection" tool to select the rectangle and then hit Ctrl+D to make a duplicate:


 7. While the duplicate is still selected go down to the color palette and click the white color to change it to white:


  8. Click one of the bottom corner arrows of the selected duplicate and drag it inwards a wee bit, then click the opposite top corner arrow and drag inward a bit also as shown below:


  9. Click outside to deselect. Click the "Eclipse" tool, choose black from the color palette and make an oval like this:


 10. Click Ctrl+D to make a duplicate, then while holding down just Ctrl put mouse pointer over duplicate and move duplicate a teeny bit down:


11. While holding down SHIFT click one of the middle arrows on the side and move inward just a bit: 


12. Deselect by clicking anywhere outside. Using the selection tool draw a rectangle around both ovals so that both become selected.


13. With both ovals selected choose "Union" from the "Path" menu so that the ovals become one object: 


14. Using the selection tool hold down left mouse button over the unified oval and move it under the glass made from the rectangle like so: 


 15. While oval is still selected click the "Lower selection to bottom" button to move oval behind the glass: 


 16. Click outside to deselect. Next, with the rectangle tool make the stem: 


 17. With selection tool hold down left mouse button over stem and move it over to glass like so: 


 18. With the eclipse tool make a flat eclipse like so: 


 19.  Move the eclipse you just made to the bottom of the stem with the selection tool: 


 20. With the selection tool select the unified oval you made earlier and press Ctrl+D to make a duplicate: 


21. With the unified oval still selected, move it to the bottom of the stem and flip it upside down by clicking the flip objects vertically button: 


22. We are now going to align the stem and ovals so that they are centered perfectly with the glass. Select the ovals and stem by drawing a rectangle around them with the selection tool like so: 


 While they are still selected hold down SHIFT and select the black layer of the glass by clicking on it: 


 Click the "Align and distribute objects" button and in the dialog box click the "Center on vertical axis" button to center stem and ovals with the glass: 


23. Now for the finishing touch. Deselect everything by clicking on an outside area with the selection tool. Make a small rectangle with the rectangle tool:

https://www.dreamstime.com/stock-illustration-wine-glass-set-black-white-white-background-image60310868#res6177650


From the "Path" menu choose "Object to path".

While holding down SHIFT click the top and bottom node on the right side with the node tool to select them:


 Use the node tool to manipulate into the desired shape as shown below:


24. With selection tool position the newly made shape onto the glass and we are done:

https://www.dreamstime.com/stock-illustration-wine-glass-set-black-white-white-background-image60310868#res6177650
  And there you go, I hope you found drawing a wine glass helpful in learning Inkscape.

Saturday, March 30, 2013

How To Draw A Tennis Ball In Inkscape


 Beginner Inkscape Tutorial

Here is a quick and easy beginner tutorial showing you how to make a simple tennis ball like the one pictured here.

No previous experience in Inkscape needed.


1. With the ellipse tool make a circle by dragging mouse while holding down Ctrl on your keyboard so that it will be a perfect circle:


2. Click a color on the color palette at the bottom of Inkscape to give the circle a "tennis ball" color:


3. Select the circle with the Selection tool and make a duplicate by pressing Ctrl+D on your keyboard.


4. The duplicate is now selected and sitting on top of the original circle. Add a border around the duplicate by holding down the Shift key while clicking on a gray color on the palette:


 5. Under the color palette on the bottom left corner of Inkscape you will see 2 color bars, the Fill bar showing the color of the circle, and the Stroke bar showing the color of the border:

 Beside the stroke bar there is a number that represents the border's width, right click on the number and choose 16 frrom the pop up menu to make the border wider:


 6. With your mouse drag the duplicate to the side so it overlaps the original circle as shown below while at the same time holding down Ctrl to keep it horizontally aligned with the original:


7. While the duplicate is still selected remove the fill color by right clicking on the Fill bar under the color palette and choose "Remove fill" from the pop up menu:


 8. With the duplicate still selected make a duplicate of it and drag it to the other side of the original circle while holding down the Ctrl key to keep it horizontally aligned:


9. Click anywhere outside on the white space to deselect. Now click on the green circle to select it and make a duplicate of it by pressing Ctrl+D This is what you should have:


10. With the green duplicate still selected give it a border by clicking any color on the color palette while holding down the Shift key:


11. Remove the green fill color from the duplicate by right clicking the Fill bar under the color palette and select Remove fill from the pop menu:


12. Deselect by clicking anywhere in the white space.

13.  Select both of the circles that were previously moved to the side by holding down Shift and click the gray border of each circle. Still holding down Shift select the bordered circle in the middle by clicking on it at the point where it's border intersects the other circle so that you DON'T accidently select the green circle on the bottom:


14. From the Object menu choose clip > Set as shown below:

And there you go, you have a tennis ball. I hope you found this tutorial helpful in learning inkscape.


Monday, February 25, 2013

Making A Drop Shadow In Inkscape


In the previous tutorial you learned how to make a simple but eye catching Inkscape text effect, in this tutorial you will see how to add a drop shadow to it.


 1. Click on text with the selection tool and make a duplicate by pressing Ctrl+D on your keyboard:


 2. While the duplicate is still selected, change the color to gray from the color palette, also remove the white border by right clicking on the "Stroke" color bar and choosing Remove stroke in the pop up menu:


 3.  Hold down left mouse button on gray text, drag it just a wee bit down and to the right like so:


4. With the gray text still selected, click the "Lower selection to bottom" button near the top of Inkscape to move the gray text behind the other text as shown in the illustration:


 5. From the Object menu select Fill and Stroke.. to access a dialog box:


6. Slide the blur to around 4 and you have yourself a drop shadow:


And we are done, don't ya just love Inkscape!  If you found this tutorial helpful and easy understand.I'd love for you to let me know.